Zoom Rooms
The Carpentries offers three Zoom rooms for public community events. Zoom rooms are available for The Carpentries events such as instructor trainings, discussion sessions, teaching demos, and committee meetings. The following information assumes you are using the most recent version of the Zoom client.
General Room Usage and Links
Rooms are generally used as follows. However, any room can be used for other purposes if it is available.
Room 1: Instructor Training
Room 2: Community events (teaching demos, discussion sessions, committee meetings, etc.)
Room 3: Other events as needed
Events are scheduled for each room by The Carpentries Core Team. Each event will have a URL in the format https://carpentries.zoom.us/my/**room_name**.
For Instructor Training events, this link will be shared with the Trainers and trainees for that event. For Community Discussion sessions and Teaching Demos, the link will be on the relevant Etherpad and in that event’s description on our Community Calendar. As required by Zoom, all rooms have a password. The password is available to all participants via the event’s etherpad, the calendar listing, or shared directly by the event host or organizer.
Information for event hosts
Please read below if you are teaching an Instructor Training workshop or hosting a Teaching Demo or Community Discussion.
Gaining Host Access
If you are teaching an Instructor Training workshop, about a week before the event, you will receive an email with host credentials and other logistical information.
If you are hosting a Community Discussion or Teaching Demo, you should have signed up to do so via Calendly. Two days before the event, you will receive an automated email from Calendly that includes the host key for the event.
Using a Waiting Room
Once you have entered and claimed host access, it is recommended that you create a waiting room. This enables you to explicitly let people in, rather than allowing anyone to simply come in. It helps prevent “zoombombing,” or entry of unwelcome guests. The host can then admit or deny people in the waiting room; send existing participants to the waiting room; and send messages to the waiting room. Waiting room participants can not message the host.
Transferring host privileges or assigning a co-host
A host may transfer host privileges or assign a co-host. It is highly recommended that the host always assign 1-2 co-hosts. The co-hosts can be whoever is facilitating the session with you, or at your discretion, a trusted participant if you are leading a session alone. The co-hosts can help moderate the room, including making sure people are muted. This also ensures that if the host is accidentally bumped from the call, host access will go to a co-host. Otherwise, Zoom will assign host status to a random participant, making it potentially difficult to re-claim host access.
Read about how to make a participant a co-host.
The co-host has most but not all of the same privileges as host. Read about the co-host’s limitations.
Turning participants’ audio on or off
As host or co-host, you will be able to mute and unmute participants. This can either be done selectively or for the room as a whole. By default, participants can unmute themselves. The host can also choose not to allow participants to unmute themselves.
Creating Breakout Rooms
Either the host or co-host can assign, start, and end breakout rooms. They can also move between rooms and message all rooms.
Read more about how to create and manage breakout rooms. This includes setting options for rooms to be created automatically, manually (assigned by host), or allowing participants to choose their own rooms.
Non-verbal, real time feedback
Participants can offer non-verbal feedback during a call. This may include using emojis to represent yes/no responses, a raised hand, and more. Available reactions may depend on the user’s platform.
Read more about how to manage non-verbal and real time feedback
Screen sharing
Screen sharing access is limited to hosts and co-hosts. They can choose to grant access to participants.
Read more about granting or denying participants ability to screen share.
Screen sharing options include ability to share just one window or the entire desktop; to share sound; and more. Some of these features may be limited by the user’s operating system.
Zoom chat
During a meeting, users can send message to all other users or to indivdiaul participants. Hosts can manage who participants can chat with or disable chat entirely.
Closed captioning
Zoom provides automatic captioning of calls. Accuracy of captioning may be limited due to factors such sound quality, accents, dialects, and jargon.
Read about how to enable automatic captioning.
The host can also assign a participant to type closed captions.
Read more about how to assign a participant to type closed captions.
Ending a call
When the room host clicks “End” a dialogue box appears with two options: “Leave Meeting” and “End Meeting for All”. Be careful not to end the meeting if you are leaving the room while the event is still active.
If the host leaves while participants are still in the room, the host will be asked to designate a new host before they can leave.
Participant view
Participants can manage their screen view to show a gallery view of all participants or only show the current speaker. Views can also be set when screensharing.
For Administrators: Scheduling Zoom Rooms
Zoom Room 1 is scheduled by The Carpentries Core Team for online instructor training events. Zoom Room 2 is for Community Discussions and Instructor Training Demos. These events are scheduled by Discussion Hosts and Trainers using Calendly. Attendees can sign up to attend these events on the relevant Etherpads.
Community Discussions:
Teaching Demos:
If you would like to schedule a Zoom Room for another event, please contact us at team@carpentries.org.
Viewing Zoom Room Availability
Zoom room calendar views are public - anyone can view whether a room is available. Only Carpentries Core Team can actually book a room. If a room is available, please contact a Core Team member or team@carpentries.org if you would like to make a room reservation.
Room availability can be viewed below.
Red: Room 1
Orange: Room 2
Green: Room 3
Adding an Event to the Community Calendar
Note while anyone can view room availability, only Carpentries Core Team members may book events or reserve a Zoom room.
To add an event to the Community Calendar and book a Zoom Room for it:
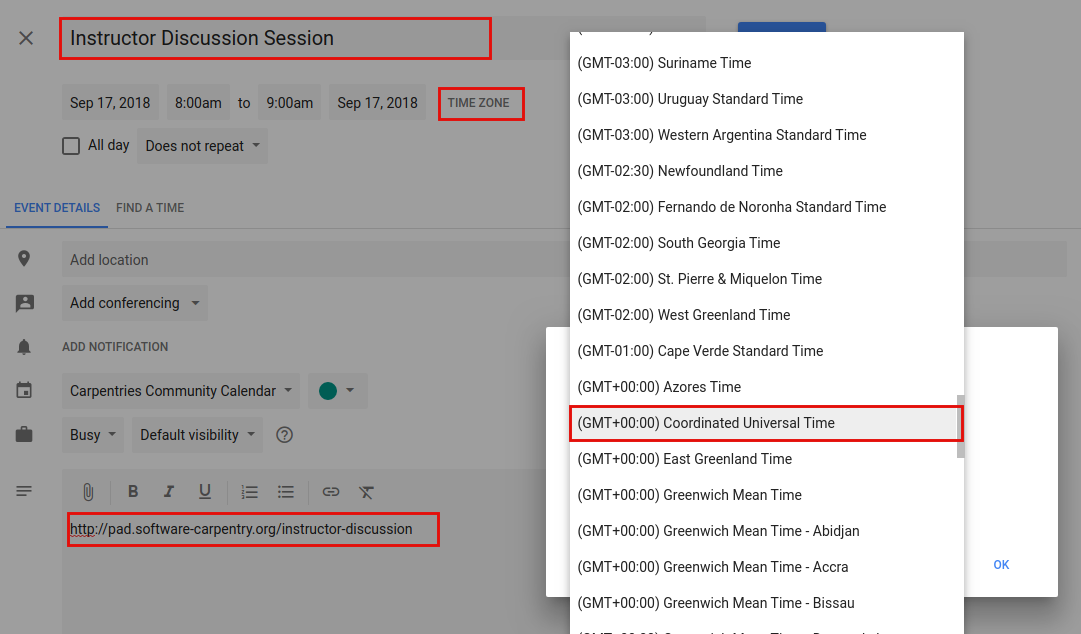
Give the event a meaningful title (“Demos” is not as good as “Instructor Training Teaching Demos”)
List the time zone in UTC - not your local time zone. Events set in local time zones do not always correctly adjust for daylight savings time.
Add a description, including a link to the relevant Etherpad or other document.
Select a room.
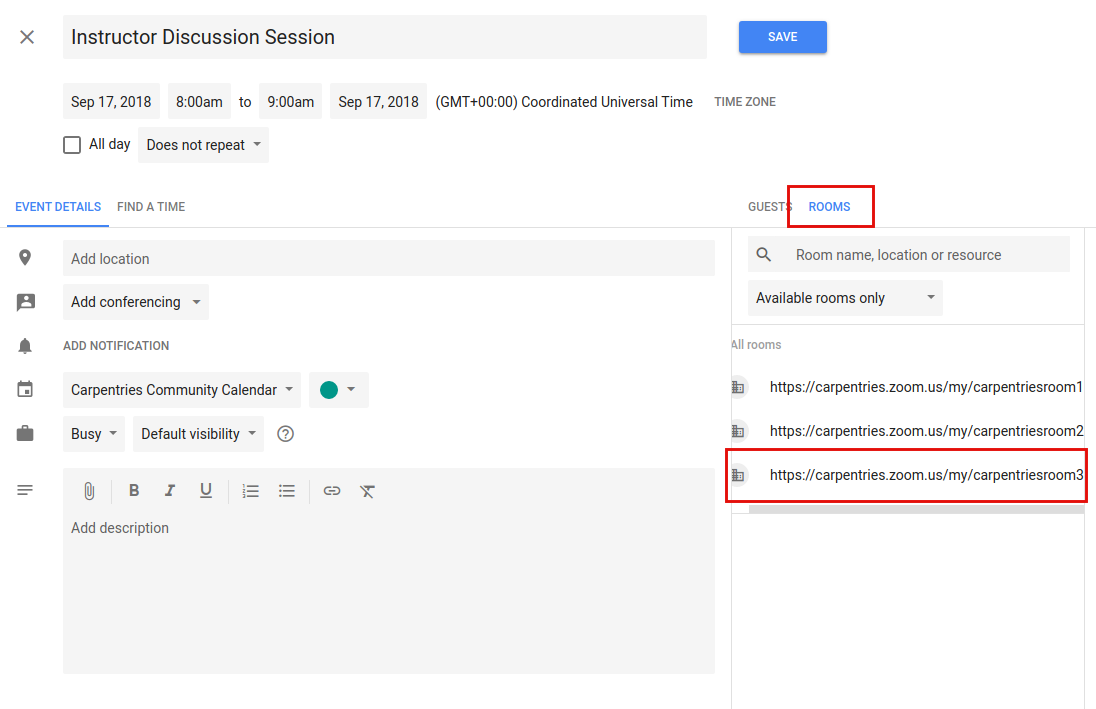
Each available room will be listed. If you are scheduling a recurring event, any future conflict will prevent a given room from being listed as available.
Multiple rooms can be selected for a single event.
Click on a room to select it. The Zoom link will now appear in the location.
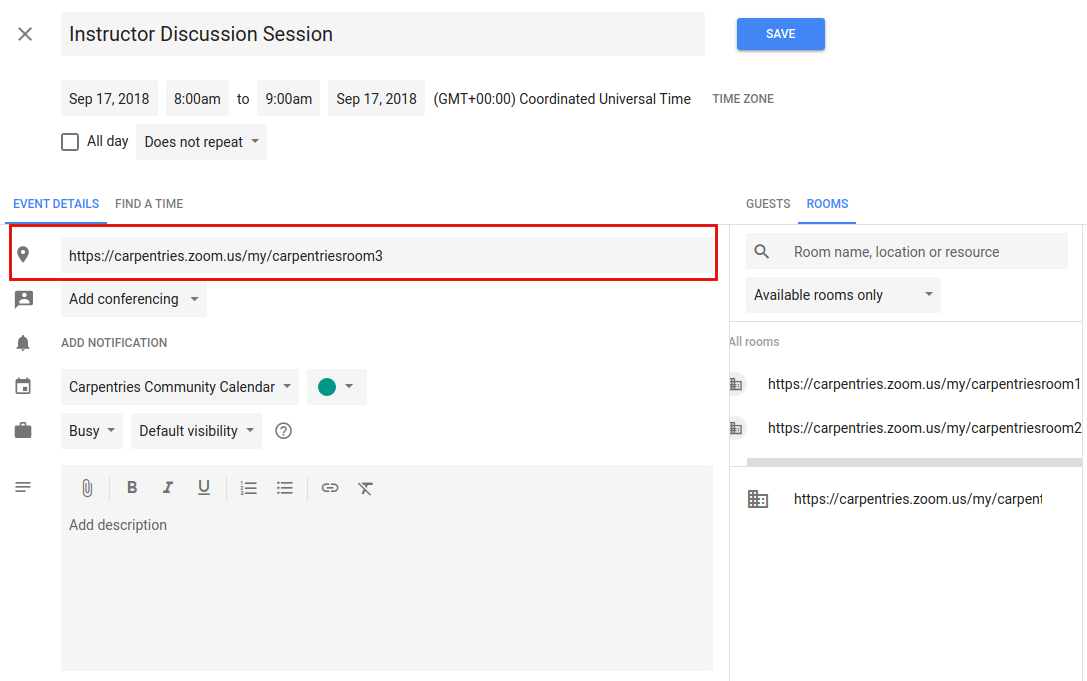
If you select a room and immediately remove it, it may not appear as available again until you close out the edit event screen and enter it again.
Save the event.
The event will now show up on The Carpentries Community Calendar and the Zoom Rooms Calendar.
Be sure to complete the above steps in order (i.e., do not select a room before setting the exact date and time).
Creating a Zoom Room Option on Google Calendars
This will only need to be done once for each new room. This is already done for Zoom Rooms 1, 2, and 3. If additional Zoom rooms are added, they will need to be set up here. This must be done by someone with admin access to The Carpentries’ Google console.
Go to the Google admin console. Click on “Buildings and Resources” and then click “Edit Resources” under “Resource Management.”
You will see all existing buildings and rooms listed. This feature is meant for physical buildings; we are using it for virtual videoconferencing rooms. One “building” is set up, called “Zoom Rooms” that contains three resources – Zoom Room 1, Zoom Room 2, and Zoom Room 3.
To add a new “room” in this “building” - click on the yellow plus sign next to “Resources.” Fill out the following information:
Category: (no category set)
Type: leave blank
Building: Undefined
Floor: Undefined
Floor section: leave blank
Resource name: Link to the Zoom Room
Capacity: 100 (standard for all Zoom rooms)
Features: leave blank
User visible description: Note what this room is used for.
When done, click “ADD RESOURCE” and this new room should be on your list of rooms. This room will now be available for scheduling events as described above.